今回はSwiftでレイアウトを簡単に実装できるライブラリ「Cartography」の導入から基本的な使い方を解説していきます!
目次
実装環境
- Xcode Version 11.4
- Swift5
- iPhoneXS , iOS 13.2.3
- Cartography 3.0
>> Cartographyの公式サイト(github)はこちら
Cartographyの導入
CocoaPodsを使ってインストールします。
ターミナルでプロジェクトに移動したら次のように進めましょう。
まずはPodfileを新しく作ります。
 command
pod init
次にPodfileを書き換えるためにPodfileを開きます。
 command
vi Podfile
Podfileを次のように書き換えましょう。
 command
target 'プロジェクト名' do
pod 'Cartography', '~> 3.0'
use_frameworks!
end
書き換えたら「escボタン」を押して「:wq」と入力して変更を保存しましょう。
最期にpodをインストールして終了です。
 command
pod install
Cartographyを使ったレイアウト
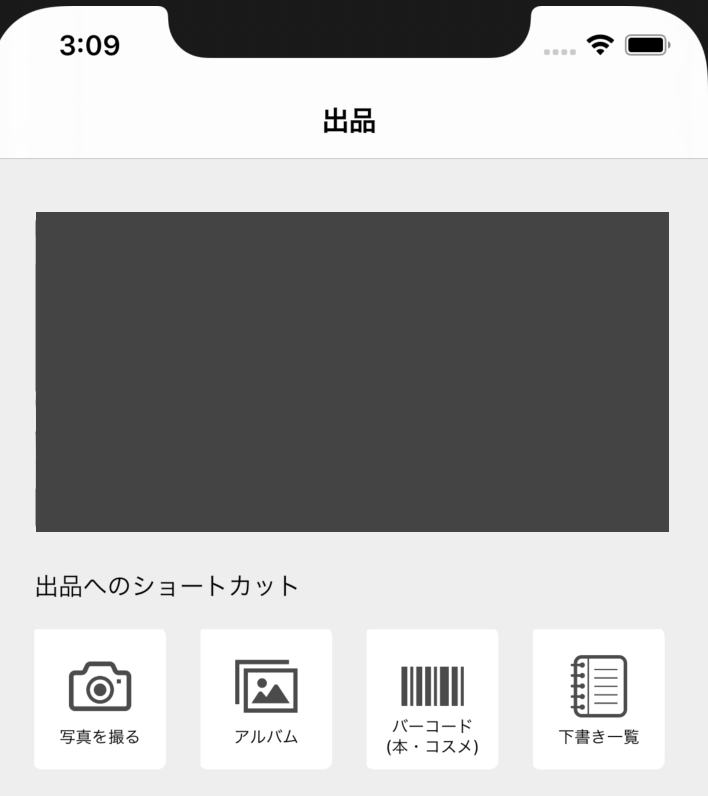
今回は下のような画面を作っていきます。
(某フリマアプリの出品画面のUIをモチーフにしています)

バナー画像の配置

まずはCartographyで上の灰色のバナー画像を配置してみましょう。
1 2 3 4 5 6 7 8 9 10 11 12 13 | //画面の横幅の長さを取得する変数を宣言 let width = UIScreen.main.bounds.size.width //banner画像 let banner_image:UIImage = UIImage(named:"logo")! let imageView = UIImageView(image:banner_image) self.view.addSubview(imageView) constrain(imageView, view) { banner_image, view in banner_image.top == banner_image.superview!.top + 120 banner_image.left == banner_image.superview!.left + 25 banner_image.width == width - 50 banner_image.height == (width - 50) / 2 } |
画像サイズは最初に取得した画面の横幅(width)を基準に設定しています。
1 | banner_image.top == banner_image.superview!.top + 120 |
ちなみに例としてこちらの文章を解説すると
「banner_imageの上部のy座標 == banner_imageの親要素の上から120pxの距離」
という意味になります。
テキストの配置

続いて「出品へのショートカット」というテキスト(UILabel)を配置していきましょう。
1 2 3 4 5 6 7 8 9 10 11 | //出品へのショートカット let titleLabel = UILabel() titleLabel.text = "出品へのショートカット" titleLabel.font = UIFont.systemFont(ofSize: 15) self.view.addSubview(titleLabel) constrain(titleLabel, view) { titleLabel, view in titleLabel.width == width titleLabel.height == 50 titleLabel.top == titleLabel.superview!.top + 310 titleLabel.left == titleLabel.superview!.left + 25 } |
先程の画像配置とほとんど同じですね。
フォントや文字サイズはSwift標準の構文を使って記述しています。
viewを並列させる

続いて一番下の4つ並んでいるviewを実装していきます。
こちらは背景である白い四角形を親要素にして画像とテキストを配置しています。
まずは四角形を出力するクラスを作るために別ファイルを作成します。
1 2 3 4 5 6 7 8 9 10 11 12 13 14 15 16 17 18 19 20 21 22 23 | import UIKit class DrawView: UIView { override init(frame: CGRect) { super.init(frame: frame); self.backgroundColor = UIColor.clear; } required init?(coder aDecoder: NSCoder) { fatalError("init(coder:) has not been implemented") } override func draw(_ rect: CGRect) { let roundrRectangle = UIBezierPath(roundedRect: CGRect(x: 0, y: 0, width: 75, height: 80), cornerRadius: 4.0) UIColor.white.setFill() roundrRectangle.fill() UIColor.white.setStroke() roundrRectangle.lineWidth = 2.0 roundrRectangle.stroke() } } |
続いて作成したDrawViewを使って白い四角形を、Cartographyで4つ並列させます。
1 2 3 4 5 6 7 8 9 10 11 12 13 14 15 16 17 18 19 20 21 22 | //4つの四角形 let testDraw1 = DrawView(frame: self.view.bounds) let testDraw2 = DrawView(frame: self.view.bounds) let testDraw3 = DrawView(frame: self.view.bounds) let testDraw4 = DrawView(frame: self.view.bounds) let testDrawData = [testDraw1, testDraw2, testDraw3, testDraw4] for testdata in testDrawData { self.view.addSubview(testdata) } constrain(testDraw1, testDraw2, testDraw3, testDraw4, view) { testDraw1, testDraw2, testDraw3, testDraw4, view in testDraw1.top == testDraw1.superview!.top + 360 testDraw1.left == testDraw1.superview!.left + 25 testDraw2.height == 85.0 testDraw2.width == (width - 110)/4 testDraw1.size == testDraw2.size testDraw3.size == testDraw2.size testDraw4.size == testDraw2.size // Aligns align(top: testDraw1, testDraw2, testDraw3, testDraw4) // Distributes distribute(by: 20.0, horizontally: testDraw1, testDraw2, testDraw3, testDraw4) } |
並列させたviewの端を揃えたい場合にはalignを、並列したviewに間隔を設定したい時はdistributeを使います。
これで4つの四角形を並列に実装できました。
次はそれぞれの四角形にアイコン画像とテキストを配置していきます。
アイコン画像の配置
1 2 3 4 5 6 7 8 9 10 11 12 13 14 15 16 17 18 19 | //4つの項目の画像 let image1:UIImage = UIImage(named:"image1")! let imageView1 = UIImageView(image:image1) let image2:UIImage = UIImage(named:"image2")! let imageView2 = UIImageView(image:image2) let image3:UIImage = UIImage(named:"image3")! let imageView3 = UIImageView(image:image3) let image4:UIImage = UIImage(named:"image4")! let imageView4 = UIImageView(image:image4) let imageData = [testDraw1:imageView1, testDraw2:imageView2, testDraw3:imageView3, testDraw4:imageView4] imageData.forEach{(key,value) -> Void in (key).addSubview(value) constrain((value), view) { image, view in image.top == image.superview!.top + 15 image.centerX == image.superview!.centerX image.width == (width - 110)/4 - 40 image.height == (width - 110)/4 - 40 } } |
4つの画像に共通する処理はいちいち書くのは効率的ではないので、辞書の配列を使って繰り返し処理をしています。
テキストの配置
1 2 3 4 5 6 7 8 9 10 11 12 13 14 15 16 17 18 19 20 21 22 23 24 25 26 27 28 29 30 31 32 33 | //4つの項目のテキスト let text1 = UILabel() let text2 = UILabel() let text3 = UILabel() let text4 = UILabel() text1.text = "写真を撮る" text2.text = "アルバム" text3.text = "バーコード\n(本・コスメ)" text3.numberOfLines = 2 //複数行にする text4.text = "下書き一覧" let textData = [text1:testDraw1, text2:testDraw2, text3:testDraw3, text4:testDraw4] textData.forEach{(key,value) -> Void in //(key).backgroundColor = UIColor.hex(string: "#ffffff", alpha: 1) // 背景色 (key).layer.borderWidth = 0 // 枠線の幅(0なので表示なし) (key).layer.cornerRadius = 3.0 (key).layer.masksToBounds = true (key).textAlignment = NSTextAlignment.center (key).font = UIFont.systemFont(ofSize: 10) (value).addSubview(key) } constrain(text1, text2, text3, text4, view) { view1, view2, view3, view4, view in view1.top == view1.superview!.top + 50 view1.centerX == view1.superview!.centerX view2.height >= 20.0 // 内容量に合わせてサイズを調整したい時につかう view2.width == (width - 110)/4 view1.size == view2.size view3.size == view2.size view4.size == view2.size // Aligns align(top: view1, view2, view3, view4) // Distributes distribute(by: 20.0, horizontally: view1, view2, view3, view4) } |
こちらも4つのテキストに共通する処理はいちいち書くのは効率的ではないので、辞書の配列を使って繰り返し処理をしています。
まとめ:Swiftの便利ライブラリ『Cartography』の使い方を徹底解説

今回はSwiftの便利ライブラリCartographyの基本的な使い方をご紹介しました。
Cartographyには他にも便利な機能がたくさんあります。
詳細はCartographyの公式サイト(github)をご覧ください。
SwiftやiOS開発の学習でつまづいた時、独学に限界を感じた時はこちらの記事もオススメです。
-

Swiftが学べるプログラミングスクールおすすめ6選【iPhoneアプリ開発】
Swiftを学習して挫折したからプログラミングスクールに入塾したい!でもどのスクールが良いんだろう... SwiftやiPhoneアプリ開発を学びたいけどまず何から始めたら良いのか分からない...プロ ...
更新日:2024年1月29日
-

マンツーマンサポート付きのプログラミングスクールおすすめ8選をご紹介
せっかくプログラミングを学習するなら、マンツーマンでしっかり教わりたい! マンツーマンサポート付きのプログラミングスクールを探しているけどどんなメリット・デメリットがあるのかな? 今回はこんな悩みを解 ...
更新日:2024年1月30日
-

無料体験できるプログラミングスクールおすすめ10選を解説
プログラミングスクールって思ったより高いからなかなか決められない... 無料体験できるプログラミングスクールを知りたい! せっかくプログラミングスクールに入るなら、無料体験に参加して自分に合うスクール ...
更新日:2024年1月29日


